Swift5.1.3 Xcode11.3.1 SwiftUI
- Automatic tweet created by Twitter robot
- Random text made from CSV file
- Automatic posts with Xcode SwiftUI
* Here is the highlight of YouTube tutorial.
There have been many kinds of Twitter bot nowadays. Not only Twitter but
also other SNS services have taken part in AI robot services. But, what's
like the automation to post some comment programmatically?
In this tutorial, I would like to show you the basic of how to create some
posts based on CSV file. With SwiftUI, you can create iPhone APP for automatic
tweet.
Lets's learn how to create random text with CSV file. You need the following
variables at first in SwiftUI.
@State var csvArr = [String]()
@State var elements0 = [String]()
@State var elements1 = [String]()
@State var elements2 = [String]()
@State var elements3 = [String]()
@State var elements4 = [String]()
@State var text = ""
csvArr is the first input variable from CSV file. If you would like to
review the detailed function please refer to my previous YouTube seminar
#6. The code is like this.
let url = Bundle.main.path(forResource: "fileEn", ofType: "csv")
do {
var csvString = try String(contentsOfFile: url!, encoding: String.Encoding.utf8)
self.csvArr = csvString.components(separatedBy: .whitespacesAndNewlines)
print("before", self.csvArr)
self.csvArr = self.csvArr.filter{!$0.isEmpty}
self.csvArr.removeFirst()
print("after", self.csvArr)
} catch let error as NSError {
print("Error: \(error)")
return
}
for sstr in self.csvArr {
let arrayPart = sstr.components(separatedBy: ",")
self.elements0.append(arrayPart[0])
self.elements1.append(arrayPart[1])
self.elements2.append(arrayPart[2])
self.elements3.append(arrayPart[3])
self.elements4.append(arrayPart[4])
}
The header row of CSV file consists of the following cells, When, Where,
Who, do and What. With these parts, the random function will create your
post for twitter.
Please check the data with the following part.
print("before", self.csvArr)
self.csvArr = self.csvArr.filter{!$0.isEmpty}
self.csvArr.removeFirst()
print("after", self.csvArr)
In SwiftUI, the space handling seems to be not enough. Some kinds of spaces
unexpectedly will be inserted in the data. So, I would recommend you not
to use spaces as much as possible. I used underscores instead of spaces
in CSV data. Later, I replace them in String of SwiftUI. Please change
this part depending on your CSV file.
for _ in self.text {
var charS = self.text
if let range = charS.range(of: "_") {
charS.replaceSubrange(range, with: " ")
self.text = charS
}
}
The random functions are shown below. the random values will be assigned
to the value of rInt1 ~ 5.
let rInt0 = Int.random(in: 0..<self.elements0.count)
let rInt1 = Int.random(in: 0..<self.elements1.count)
let rInt2 = Int.random(in: 0..<self.elements2.count)
let rInt3 = Int.random(in: 0..<self.elements3.count)
let rInt4 = Int.random(in: 0..<self.elements4.count)
self.text = "\(self.elements0[rInt0]), \(self.elements1[rInt1]),
\(self.elements2[rInt2]) \(self.elements3[rInt3]) \(self.elements4[rInt4])."
You can get the post message in the value of text as String value in textarea.
You can edit after you get it. The text area is created in this way.
TextArea(
text: $text
).frame(minWidth: 0, maxWidth: .infinity, minHeight: 0, maxHeight: .infinity)
struct TextArea: UIViewRepresentable {
@Binding var text: String
func makeUIView(context: Context) -> UITextView {
let myTextArea = UITextView()
myTextArea.delegate = context.coordinator
myTextArea.font = UIFont(name: "HelveticaNeue", size: 25)
myTextArea.backgroundColor = UIColor(displayP3Red: 0.8, green: 0.8, blue:
0.0, alpha: 0.2)
return myTextArea
}
func updateUIView(_ uiView: UITextView, context: Context) {
uiView.text = text
}
func makeCoordinator() -> Coordinator {
Coordinator(self)
}
class Coordinator : NSObject, UITextViewDelegate {
var parent: TextArea
init(_ uiTextView: TextArea) {
self.parent = uiTextView
}
func textViewDidChange(_ textView: UITextView) {
self.parent.text = textView.text
}
}
}
Finally, let me show you how to create a quick access to Twitter site.
With the webview and the designated url, you can add some web browser on
sheet view.
struct WebView : UIViewRepresentable {
var url: URL
func makeUIView(context: Context) -> WKWebView {
return WKWebView()
}
func updateUIView(_ uiView: WKWebView, context: Context) {
let request = URLRequest(url: url)
uiView.load(request)
}
}
struct SheetView: View {
@State private var showTrigger = false
var body: some View {
VStack {
Button("Twitter") {
self.showTrigger = true
}
}.sheet(isPresented: $showTrigger, onDismiss: {
print("Show TwitterView")
}) {
TwitterView()
}
}
}
struct TwitterView: View {
@Environment(\.presentationMode) var presentation
@State var urlString:String = "https://twitter.com"
var body: some View {
VStack {
WebView(url: URL(string: urlString)!)
Spacer()
Button("Close") {
self.presentation.wrappedValue.dismiss()
}
Spacer()
}.font(.custom("SFProText-Bold", size: 25))
}
}
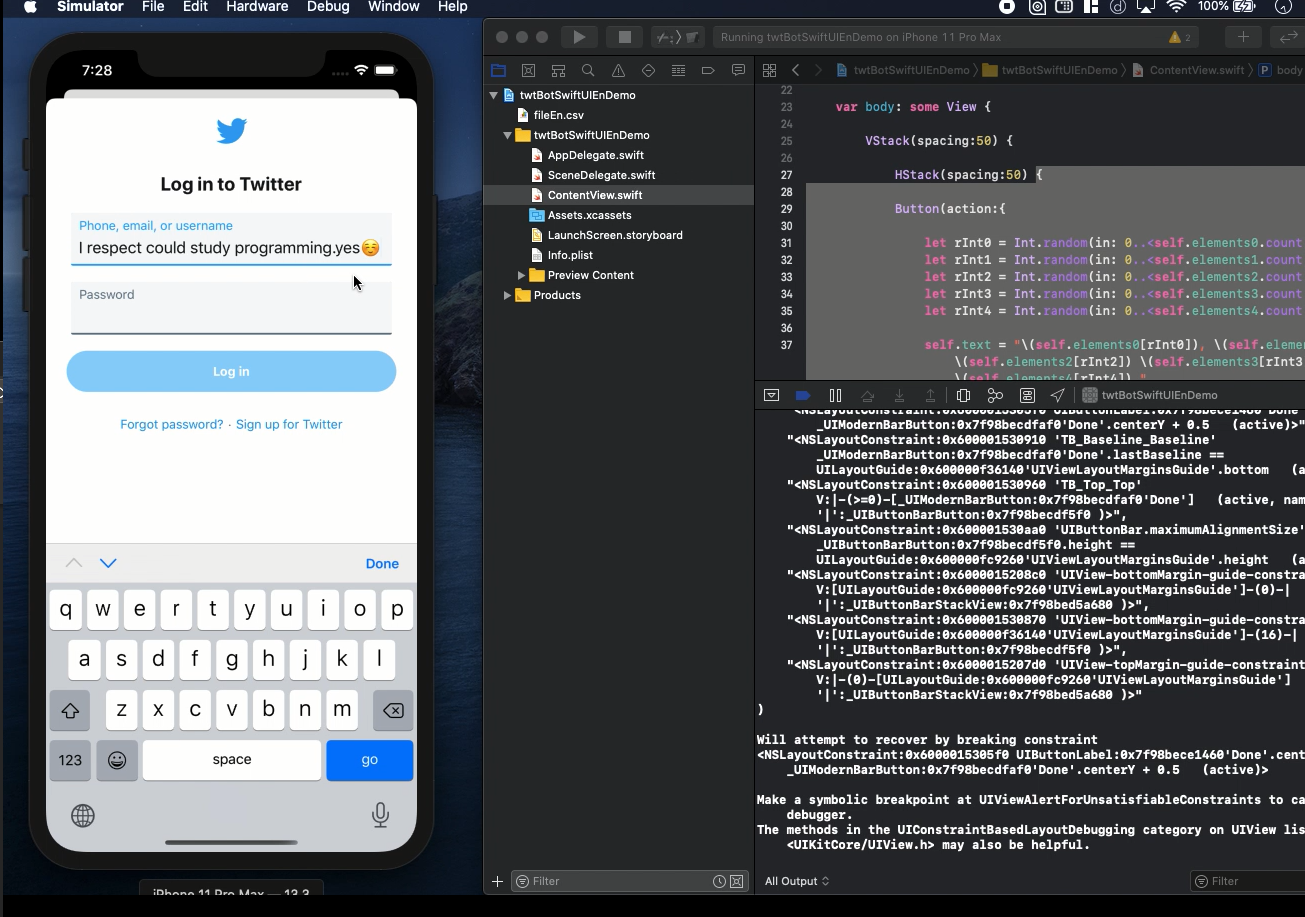
With the codes above, the final content view will be as shown below. Whenever,
you push the next button for visiting the web page of twitter. You can
post the automatic comment and go back with the button of close.
struct ContentView: View {
@State var csvArr = [String]()
@State var elements0 = [String]()
@State var elements1 = [String]()
@State var elements2 = [String]()
@State var elements3 = [String]()
@State var elements4 = [String]()
@State var text = ""
var body: some View {
VStack(spacing:50) {
HStack(spacing:50) {
Button(action:{
let rInt0 = Int.random(in: 0..<self.elements0.count)
let rInt1 = Int.random(in: 0..<self.elements1.count)
let rInt2 = Int.random(in: 0..<self.elements2.count)
let rInt3 = Int.random(in: 0..<self.elements3.count)
let rInt4 = Int.random(in: 0..<self.elements4.count)
self.text = "\(self.elements0[rInt0]), \(self.elements1[rInt1]),
\(self.elements2[rInt2]) \(self.elements3[rInt3]) \(self.elements4[rInt4])."
for _ in self.text {
var charS = self.text
if let range = charS.range(of: "_") {
charS.replaceSubrange(range, with: " ")
self.text = charS
}
}
}) {
Text("Random Message")
}
SheetView()
}
TextArea(
text: $text
).frame(minWidth: 0, maxWidth: .infinity, minHeight: 0, maxHeight: .infinity)
}
.onAppear(
perform: {
let url = Bundle.main.path(forResource: "fileEn", ofType: "csv")
do {
var csvString = try String(contentsOfFile: url!, encoding: String.Encoding.utf8)
self.csvArr = csvString.components(separatedBy: .whitespacesAndNewlines)
print("before", self.csvArr)
self.csvArr = self.csvArr.filter{!$0.isEmpty}
self.csvArr.removeFirst()
print("after", self.csvArr)
} catch let error as NSError {
print("Error: \(error)")
return
}
for sstr in self.csvArr {
let arrayPart = sstr.components(separatedBy: ",")
self.elements0.append(arrayPart[0])
self.elements1.append(arrayPart[1])
self.elements2.append(arrayPart[2])
self.elements3.append(arrayPart[3])
self.elements4.append(arrayPart[4])
}
}
)
.font(.system(size:30))
}
}
To get the source code, check the comment of my YouTube
Back to Table List
